Tutorial #1:
Creating Traffic Jam
Part IV: Coding the Puzzle
Before actually designing the part where the user gets to move pieces around, we must first create the structures for the puzzle. We will do this by creating a new class for the puzzle which will do everything itself. This class will store the information for the puzzle, save a puzzle, load a puzzle, check and track movement in a puzzle, and draw the puzzle. The puzzle class will be pretty self-sustaining. To create this class, right click on your project in the Solution Explorer window on the right hand side of the screen. Go to New->Class. A window will open asking for the name of the class, type "Puzzle" into the box and press OK. Visual Basic will present you with a new code window. We will be entering stuff here, but we will do it a piece at a time.
Start with...
    Public Enum Difficulty
        Beginner
        Intermediate
        Advanced
        Expert
        Insane
    End Enum
|
This enumeration is to track how difficult the puzzle is. It will be unused during this lesson, but will be useful in futire lessons after we have added code to load and save puzzles and need to allow the user to choose a puzzle. What you will slowly come to realize is that this class is far from complete, but we will add as we go along.
Next, we get the following:
    Public Enum VehicleType
        Car
        Truck
    End Enum


    Public Enum Direction
        Horizontal
        Vertical
    End Enum
|
These are two more enumerations whose purpose is probbly clear. In Traffic Jam, there are two types of vehicles, cars and trucks. A car will occupy two spaces of the board, and a truck will occupy three. The second enumeration tells which direction the vehicle runs. Next up is a structure which will store the data for each vehicle.
    Private Structure VehiclePos
        Public X As Integer
        Public Y As Integer
        Public VType As VehicleType
        Public Dir As Direction
    End Structure
|
This structure should be pretty self-explanatory. It stores and X and Y position, which will represent the vehicle's position on the board. The rows and columns are numbered from 0 to 5, as you will see soon. The VType variable stores which kind of a vehicle it is and refers to the above enumeration.The Dir variable stores a direction from the above enumeration. This structure will change over the course of the development of this game for reasons that will be explained shortly.
Next up, some variable declarations:
    'There can be no more than 16 vehicles
    Private Const MAXVEHICLES As Integer = 16

    Private Level As Difficulty
    Private NumVehicles As Integer
    Private Vehicles As New Collection
    Private RedCar As VehiclePos
    Private Board(0 To 5, 0 To 5) As Integer
|
Here, we have a constant that declares the number of vehicles and some variables to store data concerning the vehicles. Notice the use of a collection to store the vehicles. A collection will allow the number of vehicles to grow and shrink without wasting memory. At a later time, this will change, but for now, it works well for us. Notice also that the red car is given its own variable. This makes it easier for us to track and will make checking for the victory conditions easier. The board array will store which vehicle is at a given position. Vehicles 1 to 15 represent the other vehicles while 16 represents the red car. This will be used in the next tutorial to check for collisions as we move the cars.
Next, a couple of routines:
    Public Function GetDifficulty() As String
        Return Level.ToString
    End Function


    Public Sub SetDifficulty(ByVal Diff As String)
        Level = Diff
End Sub |
These two pieces of code are somewhat self-explanatory, so we will move on.
    Public Sub AddVehicle(ByVal X As Integer, ByVal Y As Integer, _
			ByVal VType As VehicleType, ByVal Dir As Direction)
        Dim VP As VehiclePos
        Dim i As Integer
        Dim Clear As Boolean

        'Do we have all of the vehicles?
        'If so, do nothing
        'It is minus one because we will reserve the last spot for the "Red Car"
        If NumVehicles > MAXVEHICLES - 1 Then Exit Sub

        'Create the structure
        VP.X = X
        VP.Y = Y
        VP.VType = VType
        VP.Dir = Dir
        'Is it clear?
        Clear = True 'Start out clear, and then check if it isn't
        Select Case Dir
            Case Direction.Horizontal
                'The vehicle goes horizontal
                Select Case VType
                    Case VehicleType.Car
                        'We have a car which takes two spots
                        For i = 0 To 1
                            If Board(X + i, Y) > 0 Then
                                Clear = False
                            End If
                        Next
                    Case VehicleType.Truck
                        'We have a truck which takes three spots
                        For i = 0 To 2
                            If Board(X + i, Y) > 0 Then
                                Clear = False
                            End If
                        Next
                End Select
            Case Direction.Vertical
                'The vehicle goes horizontal
                Select Case VType
                    Case VehicleType.Car
                        'We have a car which takes two spots
                        For i = 0 To 1
                            If Board(X, Y + i) > 0 Then
                                Clear = False
                            End If
                        Next
                    Case VehicleType.Truck
                        'We have a truck which takes three spots
                        For i = 0 To 2
                            If Board(X, Y + i) > 0 Then
                                Clear = False
                            End If
                        Next
                End Select
        End Select
        'Is it clear?
        If Not Clear Then Exit Sub 'If not, do nothing
        'Now, we need to set the board to point to our vehicle
        Select Case Dir
            Case Direction.Horizontal
                'The vehicle goes horizontal
                Select Case VType
                    Case VehicleType.Car
                        'We have a car which takes two spots
                        For i = 0 To 1
                            Board(X + i, Y) = NumVehicles + 1
                        Next
                    Case VehicleType.Truck
                        'We have a truck which takes three spots
                        For i = 0 To 2
                            Board(X + i, Y) = NumVehicles + 1
                        Next
                End Select
            Case Direction.Vertical
                'The vehicle goes horizontal
                Select Case VType
                    Case VehicleType.Car
                        'We have a car which takes two spots
                        For i = 0 To 1
                            Board(X, Y + i) = NumVehicles + 1
                        Next
                    Case VehicleType.Truck
                        'We have a truck which takes three spots
                        For i = 0 To 2
                            Board(X, Y + i) = NumVehicles + 1
                        Next
                End Select
        End Select
        'And now, add it to the collection
        NumVehicles = NumVehicles + 1
        Vehicles.Add(VP, NumVehicles.ToString)
End Sub |
That is a lengthy piece of code that allows us to add a piece to the board. This will allow us to add any piece except for the red car. Notice that it will also allow any number of cars and trucks, when, in the final version, we will only be allowed to have four trucks. (Enjoy the extras for now, or just modify the code when we are finished to allow for more!) I have commented this code while writing it, so hopefully it explains what is happening. Basically, it checks to see which direction the vehicle goes and what type it is. Then, it checks to make sure that there is no collision with another vehicle. If there is, it is not allowed to be added. If not, then the vehicle is added to the board and the collection.
    Public Sub AddRedCar(ByVal X As Integer, ByVal Y As Integer)
        'This sub sets the position of the red car and will not be
		'as complex as the one above.
        Dim VP As VehiclePos

        VP.X = X
        VP.Y = Y
        VP.VType = VehicleType.Car
        VP.Dir = Direction.Horizontal
        If Board(X, Y) > 0 Or Board(X + 1, Y) > 0 Then
            Exit Sub 'Not clear
        End If
        'Clear, so set the board
        Board(X, Y) = 16
        Board(X + 1, Y) = 16
        Vehicles.Add(VP, "16") 'Store it as vehicle number 16
End Sub |
This code does the same thing, but only for the red car. Notice that there is no check for type or direction as these are automatic.
    Public Sub Draw(ByVal g As Graphics)
        Dim VP As VehiclePos
        Dim i As Integer
        Dim X1, W, Y1, H As Integer
        Dim Spaces As Integer

        For i = 1 To NumVehicles
            VP = Vehicles(i.ToString)
            X1 = VP.X * 64
            Y1 = VP.Y * 64
            If VP.VType = VehicleType.Car Then
                Spaces = 2
            Else
                Spaces = 3
            End If
            Select Case VP.Dir
                Case Direction.Horizontal
                    W = Spaces * 64
                    H = 64
                Case Direction.Vertical
                    W = 64
                    H = Spaces * 64
            End Select
            g.FillRectangle(New SolidBrush(GetColor(i)), X1 + 3, Y1 + 3, W - 2, H - 2)
        Next
        'Now, draw the red car
        VP = Vehicles("16")
        X1 = VP.X * 64
        Y1 = VP.Y * 64
        Select Case VP.Dir
            Case Direction.Horizontal
                W = 128
                H = 64
            Case Direction.Vertical
                W = 64
                H = 128
        End Select
        g.FillRectangle(New SolidBrush(GetColor(16)), X1 + 3, Y1 + 3, W - 2, H - 2)
End Sub |
Finally, some meat to the functions. This one draws the cars and trucks onto a graphics item that is passed in. Notice that, for now, the program merely draws filled rectangles to represent the cars. (Welcome to programmer art!) This will, hopefully, be changed by the time we finish the program. I will not spend a lot of time on this function as it will change drastically once we get the real art going. The difference in art is also the main reason why I have said that several things will change.
    Private Function GetColor(ByVal Num As Integer) As Color
        Select Case Num
            Case 1
                Return Color.FromArgb(255, 0, 255, 0) 'Light Green
            Case 2
                Return Color.FromArgb(255, 255, 255, 0) 'Bright Yellow
            Case 3
                Return Color.FromArgb(255, 255, 0, 255) 'Purple
            Case 4
                Return Color.FromArgb(255, 0, 0, 128) 'Mid Blue
            Case 5
                Return Color.FromArgb(255, 237, 193, 18) 'Orange
            Case 6
                Return Color.FromArgb(255, 0, 0, 255) 'Light Blue
            Case 7
                Return Color.FromArgb(255, 0, 128, 0) 'Mid-green
            Case 8
            Case 9
            Case 10
            Case 11
            Case 12
            Case 13
            Case 14
            Case 15
            Case 16
                Return Color.FromArgb(255, 255, 0, 0)
        End Select
End Function |
This function merely tells Draw what color to make each rectangle. For now, I only need the first seven and the red car. Feel free to add more colors if you want to, but once we get to real art, this will go away.
Okay, that's it for the Puzzle class part of the code. Now, we have to add it to our form.
First, at the top of the code, just under "Class frmMain" add:
Private MyPuzzle As New Puzzle |
This will declare and initialize a puzzle for the form. We will keep reusing this puzzle throughout the game.
Then, you need to add the following code somewhere within the module:
    Private Sub frmMain_Load(ByVal sender As Object, ByVal e As System.EventArgs) _
			Handles Me.Load
        MyPuzzle.AddVehicle(0, 0, Puzzle.VehicleType.Car, Puzzle.Direction.Horizontal)
        MyPuzzle.AddVehicle(5, 0, Puzzle.VehicleType.Truck, Puzzle.Direction.Vertical)
        MyPuzzle.AddVehicle(0, 1, Puzzle.VehicleType.Truck, Puzzle.Direction.Vertical)
        MyPuzzle.AddVehicle(3, 1, Puzzle.VehicleType.Truck, Puzzle.Direction.Vertical)
        MyPuzzle.AddVehicle(0, 4, Puzzle.VehicleType.Car, Puzzle.Direction.Vertical)
        MyPuzzle.AddVehicle(4, 4, Puzzle.VehicleType.Car, Puzzle.Direction.Horizontal)
        MyPuzzle.AddVehicle(2, 5, Puzzle.VehicleType.Truck, Puzzle.Direction.Horizontal)
        MyPuzzle.AddRedCar(1, 2)
End Sub |
All that this function does is to add some cars and the red car to the puzzle. If you run now, though, you will still see nothing. We need to tell the form to have the puzzle draw itself, so add the following below all of the "DrawLine"s in the paint event.
MyPuzzle.Draw(G) |
This will tell the form to draw the cars after it draws all of the lines. Now, run the program and you should see...
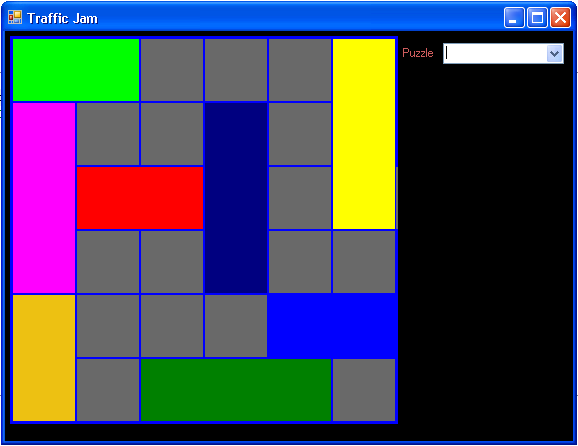
Each of those rectangles represents a different vehicle. The red one is the target and must be moved until it is at the right edge of the board.
Well, that is all for this portion. We have actually accomplished quite a bit. We have developed the internal means of storing our puzzle, provided a means by which we can add the vehicles to the puzzle, and written code to draw the puzzle. Next time, let's write code to move things around and check if it is solved!
See you then...